When we come across nRF51822 [1] processor we immediately new that this is something extremely interesting and will let us do plenty of cool stuff with microdevices or so call wearables Do be honest we didn’t even bother to check any other chip for similar functionality. It has everything that we need: Cortex M0 CPU, integrated 2.4GHz radio circuit,Real Time Clock, plenty of GPIOs, DAC and other stuff that you expect to find in other microcontrollers.
Hardware features alone might make you enthusiastic about this chip, but this is even more to come. Second the most important factor for hobby projects and starters like we are is the convenient and easy to use software stack. It just so happens that this processor is one of the many cover by ARM mbed [2] ecosystem which might be called “Arduino” in ARM world. It is really easy to program those chips with minimal and affordable necessary tools. It is super cool and allows us to immediately jump to program those processors and learn to use it instead of just trying to figure out how it works and think if we can afford expensive developer board.
Tools and Software
nRF51822
First you need some development board with nRF51822 processor. There are plenty of different kits available and you have to pick your own based on your needs and the price you want to pay. What we are using right now is called Core51822 [3]. Basically it is just a minimal board made in China with nRF51822 and on board antenna. You can find it also on eBay for less than 10$, just search for nRF51822.

Of course, we would rather use some official development board like nRF51822 Development Kit [4] or nRF51 DK [5] which is the new version of the previous one, but we can’t really afford to spend that much on it at the moment.
Programmer
One problem to overcome when switching from Arduino to ARM is to find good programmer at affordable price. JTAG programmers can cost far more than all your development boards. It will be obvious stopper for doing projects based on ARM. Hopefully we have found ST-LINK/V2 [6], which is not that expensive. You can also by some compatible devices on ebay or build your own [7].

Breadboard, wires, diodes
To make life easier at the beginning it is good to have a breadboard, bunch of wires, few resistors and diodes. You can buy all of that in your local electronic shop or at eBay.

Software stack
To program ARM we will need software to communicate with on chip debugger and gcc compiler for ARM. In this project we are using OpenOCD [9]. It has support for both ST-Link and nRF51 series chip.
To build and compile your software locally one of the options is GNU Tools for ARM Embedded Processors [10]. It is also necessary to install SRecord [11], which is used for merging binaries to be loaded into the microcontroller.
All of the programs are opensource and available for linux and mac osx as well.
In the code example we will be using mac osx, but this should be almost the same for other unix system including linux. Just download proper packages and install it according to your distribution installation procedure. It will be good if you can put it in the comments or drop us an email so we can extend this guide.
Macosx
Step 1 - If you don’t have already install Homebrew first.
http://brew.sh/
Step 2 - To install programmer execute in terminal window:
#install openocd
brew install open-ocd
Step 3 - If you would like to compile and build locally install also:
#install SRecord
brew install srecord
#install gcc
brew tap PX4/homebrew-px4
brew update
brew install gcc-arm-none-eabi-48
Blinking led
Program
Lets checkout the source code first and than we will go through whole process.
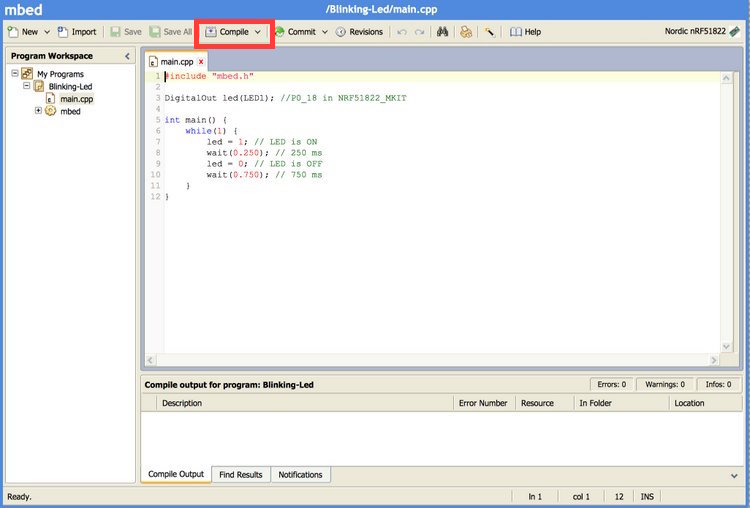
#include "mbed.h"

DigitalOut led(LED1); //P0_18 in NRF51822_MKIT

int main() {
    while(1) {
        led = 1; // LED is ON
        wait(0.250); // 250 ms
        led = 0; // LED is OFF
        wait(0.750); // 750 ms
    }
}
First you create the led object defining pin number that you would like to use. To find out what does LED1 means you can look at PinNames.h header file in the target platform. If you don’t have it locally just go to mbed github repository
As you can see to turn output on you assign one value to led object and to turn it off zero.
Compiling on mbed.org
One of the features of mbed.org is that it provides you will IDE in the browse. It also give you a easy way to compile, build and merge your software straight in the same IDE. You will download only the binaries that you can push to the processor.
Step 1 - Login or signup to developer.mbed.org
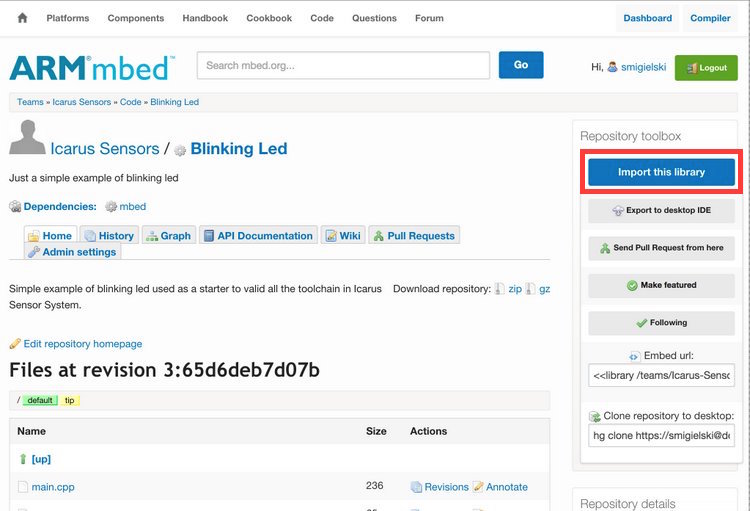
Step 2 - Navigate to Icarus Sensors / Blinking Led project and

Step 3 - Confirm importing to your repository

Step 4 - Check that you have correct platform selected
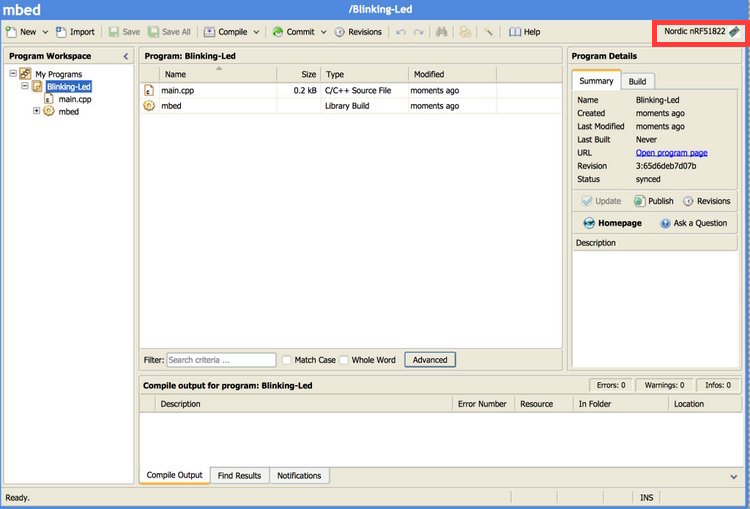
Step 5 - Browse to the main.cpp file and compile repository
Connecting programmer
Now when you have your binaries, it is the high time to import them into nRF51822. Connect you programmer to the board [13]:
nRF51822 module    ST-LINK/V2
common ground:       GND <-----------> GND   (pin5,pin6)
supply voltage:      VDD <-----------> 3.3V  (pin7,pin8)
SWD clock:           SWD <-----------> SWCLK (pin2)
SWD data I/O:      SWDIO <-----------> SWDIO (pin4)
To make it easier for you this is pinout diagram of Core51822 board.

and now run openocd
openocd -s /usr/local/Cellar/open-ocd/0.8.0/share/openocd/scripts/ -f interface/stlink-v2.cfg -f target/nrf51_stlink.tclyou should get output like that:
Open On-Chip Debugger 0.8.0 (2014-11-19-12:23)
Licensed under GNU GPL v2
For bug reports, read
	http://openocd.sourceforge.net/doc/doxygen/bugs.html
Info : This adapter doesn't support configurable speed
Info : STLINK v2 JTAG v17 API v2 SWIM v4 VID 0x0483 PID 0x3748
Info : using stlink api v2
Info : Target voltage: 3.210060
Info : nrf51.cpu: hardware has 4 breakpoints, 2 watchpoints
switch to other terminal and connect to debuger via telnet:
> telnet 127.0.0.1 4444
Trying 127.0.0.1...
Connected to localhost.
Escape character is '^]'.
Open On-Chip Debugger
> halt
target state: halted
target halted due to debug-request, current mode: Thread
xPSR: 0x21000000 pc: 0x00016420 msp: 0x20003fd0
> nrf51 mass_erase #it have to be executed only once
nRF51822-QFAA(build code: G0) 256kB Flash
> flash write_image erase Blinking-Led_NRF51822_.hex 0
auto erase enabled
Padding image section 0 with 2112 bytes
Padding image section 1 with 3572 bytes
wrote 95232 bytes from file Blinking-Led_NRF51822_.hex in 21.043299s (4.419 KiB/s)
> reset
Connect diode to pin named P0_18 and ground (you can skip resistor if you use 3.3V) and your diode should be blinking.
Compiling locally
It is also possible to build everything locally. Again start with our example repository:
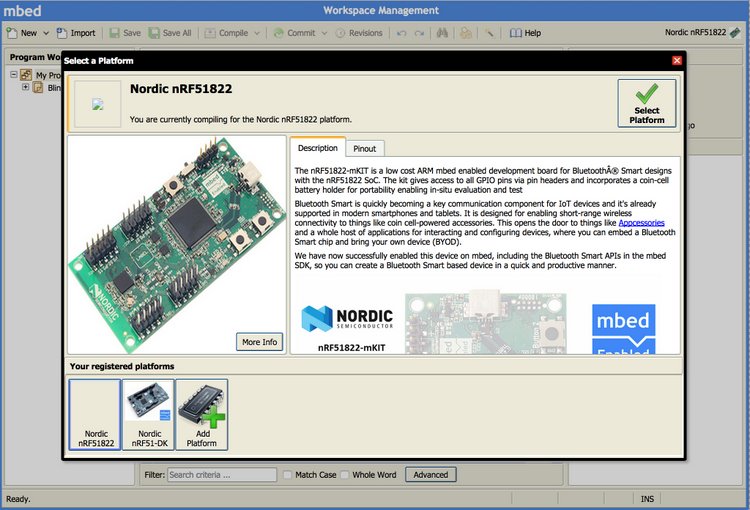
Step 1 - Navigate to Icarus Sensors / This repository is a library Blinking Led project and
Step 2 - Choose your platform Nordic nRF51822 and GccArm toolchain

Step 3 - Navigate to your downloaded repository in the terminal
cd Blinking-Led
#compile your code
make
#There is some bug in generated Makefile to fix it
sed -i "s/s110_nrf51822_7_0_0\/s110_nrf51822_7.0.0_softdevice.hex/s110_nrf51822_7_1_0\/s110_nrf51822_7.1.0_softdevice.hex/g" Makefile
make merge
mv combined.hex Blinking-Led_NRF51822_.hex
Now you can upload you binaries into the chip exactly the same as way as before.
Troubleshooting
Flash not initialized
When you get error while flashing your image like that
failed erasing sectors 0 to 116
in procedure ‘flash'
it probably means that you have to unblock your first sector of flash memory.
nrf51 mass_eraseBad connection to processor
If you get error like that check all your connection between programmer and processor. It is one of them which cause trouble.
Error: open failed
in procedure 'transport'
in procedure 'init'
The most important thing while troubleshooting is to check and double check all your connections wires.